Sunday, 17 August 2025

Accucraft GP40 Electronics and Wiring

Although Accucraft can supply the GP40 loco with their own control system, I opted to install the Mini Train Systems PS7 control system so it would match the Planet 2 loco.

I already had a set of 4 batteries, 12 V 75 Ah sealed lead acid type, which had previously been used in a ride-on mower.  Although the batteries were somewhat degraded to about 50% of their original capacity, the remaining capacity should be ample for locomotive use, as the maximum power required is around half that of the ride-on mower, and only for shorter intervals. 

Each pair of batteries is wired in parallel to give 12 V, and the main circuit breaker connects both pairs in series to provide 24 V for the power controllers.  When connected to the battery charger, all four batteries are connected in parallel and charged at 12 V.  The four batteries occupy most of the long hood portion of the loco.

I intended to mount the main circuit breaker inside the cab of the loco where it could be operated through the open side window, but the window opening was too small to get a hand inside.  Instead I mounted the main circuit breaker in the low short hood, which has an removeable top for easy access.

Main circuit breaker mounted in the low short hood.

Due to the GP40's power requirements (1400 W @ 24 V), it needed separate power controllers for each bogie, which are effectively connected the same as two locomotives in multiple unit (MU) operation.

The loco included an aluminium tray for the various electronic bits in the top of the long hood, at the rear.  The major items of equipment are the two motor controllers, circuit breakers for both 24 V and 12 V circuits, and a number of relays for auxiliary items including lights and horn.

Two relays also function as a safety interlock and are controlled via a cable plugged into the first wagon of the train to shut off motor power if the couplings become separated for any reason this preventing a runaway locomotive.

The main "electronics tray"

The motors used on the Accucraft bogies (two motors per bogie) also include an electromagnetic brake.  This brake defaults to the ON position and requires continuous 12 V power to release the brake.  Although useful as a parking brake, the magnetic brakes engage very suddenly and can only be used when the loco is at a standstill.

I wired the brake circuit independently of the safety interlock and 12 V/24V circuit breakers with a separate fuse, so that the brakes would not engage suddenly if the loco became separated from the train.  In that event, it would be preferable for the loco to coast gently to a stop rather than having the brakes suddenly lock up.

I completed the basic wiring and battery installation relatively quickly so that the loco was able to run under its own power 48 hours after delivery.  Although I expected to have to do more of the wiring myself, Accucraft had provided and labelled long enough cables for the motors, brakes, front and rear lights, horns and speakers for on-board sound effects, if desired.

Wiring in progress.  Two of the batteries are visible near the centre of the loco.

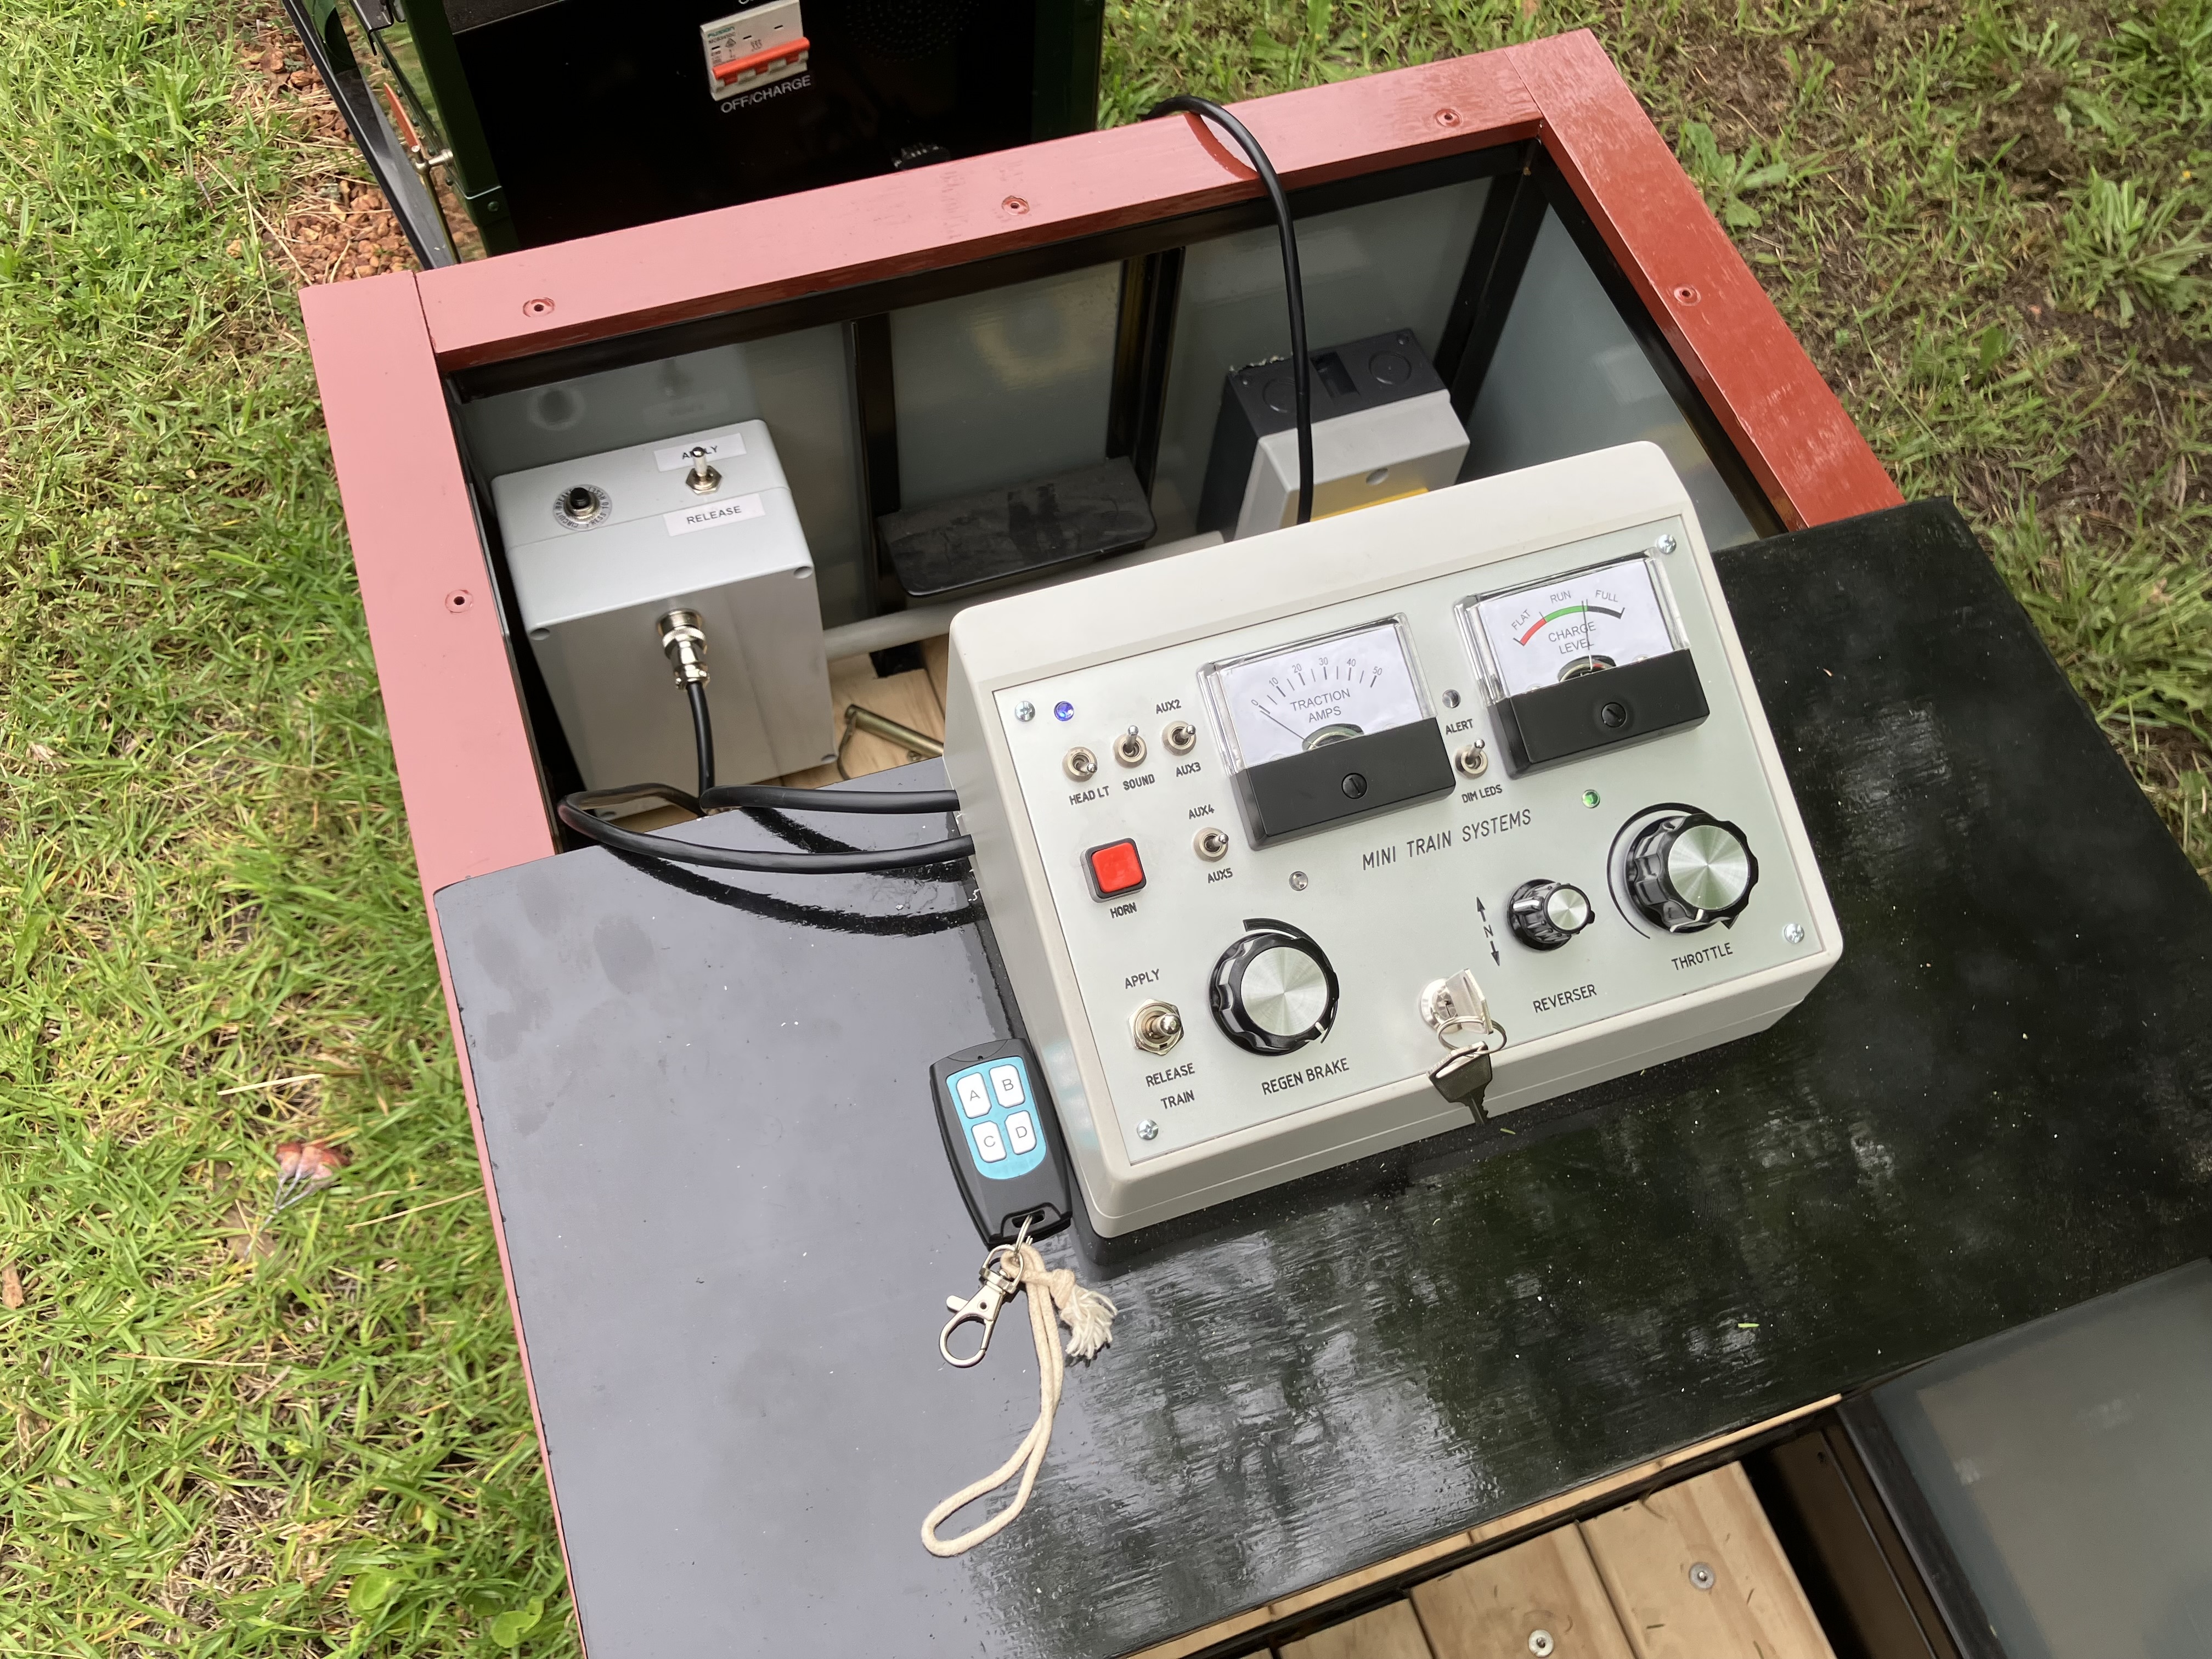
The tethered control panel from Mini Train Systems connects via a 15-pin connector, the same type as used for VGA computer monitors.  A later stage of the wiring is to fit these connectors to the headstocks at each end, so that the control panel can be plugged in to operate in either direction.  This work is still in progress.  For the initial testing, the cable for the control panel was routed via the open cab window, as this was the only opening available when the roof panels were in position.

Friday, 15 August 2025

Accucraft GP40 Loco Arrival

A very exciting day for the railway with arrival of an Accucraft GP40 locomotive which had been on order since January 2025.

Towards the end of 2024, I had been thinking about building or buying a larger locomotive, which would be able to handle the grades of up to 3% on the railway.  After exploring some ideas of building a loco using commercially available drive bogies, I decided that the Accucraft GP40 locomotive would be a good option, as I preferred a nicely-detailed loco based on an actual prototype rather than a freelanced design.

The initial inspiration came from a YouTube video of a US miniature railway with a loco in the Florida East Coast Railway livery, as the red-orange, yellow and black reminded me of the 1970's experimental International Orange livery applied to a couple of then WAGR (Western Australian Government Railways) standard gauge locos, including L Class L257.  

Although there are significant differences between the US GP40 loco and the L class, the overall shape is similar including the low "nose" on the short hood.  In the mid 1970's, when this livery was current, I was inspired to hand paint a Bachmann GP40 loco to act as a "good-enough" L class for my HO scale model railway.

L257 "International Orange" Livery - WAGR 1974 Publicity Photo from Rail Heritage WA

When I first enquired with Accucraft, they advised that the loco was made in Japan, but shipped to China for custom painting, and that I would have to arrange shipping from China to Australia.  Fortunately, an online search revealed a company - Shipping Solutions - which was able to handle all aspects of the importation, by sea container, including customs and GST payment.  Once I had confirmed that the import process was manageable, I paid an initial deposit to Accucraft to secure the order.  

A friend was able to source an original WAGR drawing showing the details of the paint scheme, and I prepared a drawing showing the livery overlaid onto an outline drawing of the GP40 locomotive.  I bought 1 litre tins of painted tinted to the appropriate Australian Standard colours for International Orange and Golden Yellow, which I used to prepare colour samples which I posted to the factory address in China.

Accucraft initially estimated that the finished loco would be ready to ship from China in May, but that proved optimistic, partly due to the US tariff situation which meant that other locos being prepared for US customers took precedence to beat the tariff deadline.

One issue that I became aware of some time after placing the order was the difference in wheel standards for 7¼" gauge in the US compared to Australia.  The common US profile is defined by the International Brotherhood of Live Steamers (IBLS).  The corresponding organisation in Australia is the Australian Association of Live Steamers (AALS).  The area of concern was the wheel check gauge, which affects how the wheels interact with the frog and check rails when negotiating points (turnouts).  Despite the common 7¼" track gauge, the IBLS wheel check gauge was 3.5 mm wider.  

Accucraft offered a choice of the IBLS wheel profile or an alternative RMI-25 profile which has a slightly deeper flange which more taper on the front of the flange.  I elected for the RMI-25 flange profile, hoping that the more tapered flange would help when running through points.  Although I was confident the US wheel profile would run ok on normal (plain) track, I was expecting that negotiating the curved, diverging leg though points could be a problem, which turned out to be the case.  

Around the end of June 2025, Accucraft advised that the loco was ready to be shipped from China and the previously arranged shipping plan swung into action, after I had paid a 50% deposit for the shipping component.  The crated loco was loaded into a shipping container with other small LCL (Less than Container Load) freight, and on a ship bound for Fremantle.  

A few days after arrival, the container was transferred to a freight depot in Welshpool, WA, where it was to be unloaded ready for pickup and final delivery.  This proved to be a complication as the freight depot had a slot booking system for freight to be picked up, and the company based near Albany which I had engaged for the final delivery, didn't understand that they needed to make the booking prior to pickup.  Their next schedule run to Perth wasn't for another 2 weeks, so I sought a quote from Freight Lines Group (FLG) for the transport to Denmark.  Although this hiccup resulted in a delay of 3 days, FLG did a good job and made the final delivery right to our door using a small truck with tail lift.  As this was the last delivery for the shift, the delivery driver even offered to wait while we unpacked the crate and helped lift the loco onto the track.  What service!  

The loco strapped to the base of the shipping crate.


Thursday, 12 December 2024

Brake Modifications to the New Open Wagons

Both of the new open wagons include electrically-operated parking brakes on one bogie.  Parking brakes are essential as most of the track is on a grade due to the topography of the site.

A simple wiring modification now means that the parking brakes can be controlled from the loco control panel as well as the from the switch mounted inside the end of each wagon.  This is much more convenient when driving and avoids having to reach forward to the switch box attached to the wagon.

To avoid any problems if both switches are operated simultaneously in opposition, the wiring includes resettable fuses (Polyswitches) which limit the battery current to a safe level.

Both wagons have now been modified, so either can be used next to the loco.  The wagons are positioned to face in opposite directions to allow for running in either direction.  The loco control panel can easily be moved between the wagons as required.


Linear actuator to operate parking brakes.  (Photo by Mini Train Systems)


Loco control panel as supplied with brake switch blanked off, at lower left.  The brake switch in the wagon is at top left.  The red switch on the right is a battery isolator switch for the locomotive.


First step - installing a 4-way connector on the brake switch box ready for external control.


Final step - installing a DPDT momentary toggle switch on the loco control panel, with a 4-wire cable to plug into the wagon's brake switch box.

Wednesday, 27 November 2024

Delivery of New Open Wagons

 An exciting day with the delivery of two open wagons which were part of the original order placed with Mini Train Systems from early 2023.  

Although considerably overdue, it was great to finally receive the wagons.

The wagons have flexible seating arrangements, and have been supplied with one longitudinal seat and a total of four transverse seats which can be fitted in various positions.  

Each wagon has an electrically actuated parking brake on one bogie, operated from a switch inside the wagon, with power supplied from a small sealed lead acid battery.  The battery is recharged when the wagon is connected to the locomotive, and can also be recharged separately if needed.  The need to recharge should be infrequent as power is only required to apply or release the brakes, otherwise they remain in the last commanded setting.

The intention is to use one wagon as the usual "driving wagon" rather than have a dedicated "driving truck".  This was the original reason for fitting a parking brake to one wagon, then it was decided to make both wagons the same, i.e. both with parking brakes, so they could be used interchangeably.  This will make it simpler, e.g. if operating in the reverse direction on the railway.


Preparing to crane the crate from the truck

The wagons were well packed inside.

After removing the top and one side of the crate, we were able to slide each wagon sideways onto the track.

Ready for the first test run..

Completing the Passing Loop

In the same delivery with the two open wagons, was also a 10 m radius point needed to complete the passing loop at the rear of the garden near the dam.  The point was transported, by train of course, and unloaded close to the installation site.

Later the same day, with the area conveniently shaded, the temporary curved track sections were unbolted, some of the ballast removed and the new point test fitted in place.  The temporary track sections had been in place for about 6 months, meaning that the passing loop had been in use as the through track for a considerable time - see Tracklaying in the Passing Loop.

The accuracy of the prefabricated track sections was such that the fixing bolts all fitted with no adjustments needed.  With some temporary packing with pieces of wood, it was possible to run trains over the point at low speed.

The tracks on both the main line and passing loop both need additional ballast to raise them to match the height of the point, which is dictated by a large tree root which we don't want to disturb.

There is still quite a bit of work to be done, including digging out the ballast to slide in long timber sleepers on which the linear actuator will be mounted to control the points, as well as connecting the 12 V power from the nearby solar panel and battery and installing the receiver for wireless remote control of the point.

The new point roughly in place.  The long timber sleepers ready for the linear actuator mounting are to the right of the track.

The partly exposed conduit is for a 12 V power cable from the solar panel and battery installation which is located in a more sunny spot mid way along the passing loop, from where power is fed to the points at both ends.

Saturday, 12 October 2024

First Steam Loco on Springdale Miniature Railway

Another Denmark resident, Rob Otway, brought over his 0-4-0 steam loco for a run.  The loco, 7 1/4" gauge of course, is a scaled up version of a "Juliet" loco originally designed for 3 1/2" gauge.  Rob and two other members of the Northern Districts Model Engineering Society built three similar locos at the same time, with completion around 2016.

As the Springdale Miniature Railway doesn't have any specific unloading facilities, Rob brought an existing ramp to allow the loco to be gently rolled down from his trailer onto the track.

After an initial run light engine in the clockwise direction, Rob decided the railway's grades would be better running anti-clockwise, so we we turned the loco by running onto an old sheet metal sign laid on one of the level crossings and swivelling it around by hand.  The three available wagons owned by Springdale Miniature Railway provided a decent load especially on the grades of up to 3%.


The video tells the story...

To provide a method of safeworking with two operating locomotives, a token or staff system was implemented so that only one loco was permitted onto the main line at any time. 


Due to fire restrictions in the Denmark shire over the summer, a repeat of the steam run won't be possible for many months.  Even in October, the trains carried pressure sprayers filled with water to take care of any minor outbreaks, which luckily didn't eventuate.


Thursday, 10 October 2024

Springdale Station Building

AI interpretation of original Station at Springdale (Chat GPT)

In April 2023, before any track arrived, I started building a one-third scale model of the small station building which once existed at the real Springdale, on the shore of Wilson Inlet.

The are very few photos of the original station.  A photo similar to that shown above turned up on Facebook, but it was of poor quality as it was a photo of an image on a computer screen taken at an angle and the perspective was distorted.  As an experiment, I used ChatGPT to correct the distortion and remove unwanted parts of the image, to produce the above photo.


The Springdale station building was a common design used by Western Australian Government Railways (WAGR) known as a Portable Shelter Shed.  The shelters were made in flat-pack form so they could be easily moved by train to wherever they were needed.

I did most of the woodwork in Perth and, true to the prototype, transported the wall panels to Denmark for final assembly and installation.  I cut the wall frames and simulated weatherboards from treated pine to the scale dimensions based on an original WAGR plan.

Wall frames taking shape.

Preparations for the curved roof.

The curved corrugated iron roof was a stumbling block for a while.  Sheets of "mini-orb" find corrugated iron were readily available with the corrugations matching the one-third scale of the building.

Initial trials with rollers intended for curving flat metal weren't successful as they tended to flatten the corrugations.  Extensive enquiries failed to find a commercial supplier able to curve the small corrugated iron sheets.

Finally, I tried cutting the sheets into narrower strips, approximating the width of scale size sheets, and gently standing on the sheet while it was supported by two blocks of wood.  Moving the sheet along about 100 mm at a time and repeating the process produced the desired curve.  It was hard to get an even curve right to the ends, but the sheets were too long anyway so I trimmed the excess.

Curving a strip of Mini-Orb.

Starting to make some progress curving the roof.

Attaching the roof after the walls had been painted.

The finished station in position next to the railway.

Push-Button Remote Control for GP40 Loco

Since I installed the Sabertooth 2x32 motor driver module in my Accucraft GP40, I have been thinking about the option of using a model aircr...